Thursday, May 11, 2023

HCIBench analysis part 2: vSAN OSA vs. vSAN ESA with all Optane drives

 In my previous post, I compared what a huge difference having proper caching drives can make with vSAN OSA, replacing my read intensive disks with Intel Optane. One question remains, however: since Optane are high performance, mixed use drives, how would they get along with a vSAN ESA deployment? To find out, I reconfigured my vSAN cluster by deleting the witness VM, deploying a vSAN ESA witness, and loaded each server with 5 Intel Optane disks each. Let's see how it got along.

Caveats: 

  • ESA has compression only mode on automatically, and cannot be disabled (OSA was tested without dedupe or compression enabled)
  • ESA best practices call for a minimum of three nodes. It can absolutely work with two nodes but would see true performance benefits in a right sized cluster


100% read, 4K random


Interesting result, as the vSAN OSA with 2x Optane for caching and 2 read intensive capacity disks actually managed 24K higher IOPS on this test. There are a few likely reasons that I think this would happen:

  1. The benchmark likely kept everything in the hot tier throughout the benchmark
  2. As mentioned previously, ESA is running compression while OSA is not. I plan on re-running this benchmark specifically with compression only enabled on the OSA configuration.
  3. ESA works best at the recommended configuration (3+ nodes).

70% read, 4K random


Where Optane improved write performance in the OSA model, ESA with 5 Optane disks per node improved further. We see an improvement of 53K IOPS, as well as higher throughput, and generally better latency across the board.


50% read/write, 8K random


We get a decent bump in performance in comparison to the OSA build. Read latency remains low, write latency remains about the same.


100% write, 256KB sequential


This is perhaps the biggest difference between all the tests, and highlights the key advantage of vSAN ESA especially for a 2 node cluster. Where some of the other tests showed percentage bumps in performance, ESA with write intensive disks managed to get over twice the throughput of vSAN OSA. 5.69GB/s represents 45.52 Gb/s over the network cards. Latency also improved dramatically.

Overall, the 2 node vSAN ESA with 5 Intel Optane disk per server configuration performs generally as expected, comparatively outperforming the OSA with capacity disks. While OSA went blow for blow with ESA, it should be reiterated that deduplication and compression were disabled; IOPS performance tends to be lower in favor of capacity. One thing that I've omitted from these is the usable capacity, of which I would defer to the vSAN calculators to get final numbers, but keep in mind: vSAN OSA accomplished it's numbers with a datastore size of ~13TB, whereas the 280GB Intel Optane disks granted a capacity just north of 2TB.

So what can we take away from this? Is OSA dead? Not by a long shot. In a real world, 2-node ROBO scenario, several questions should be asked:

  • What is the workload?
  • How much performance do you need?
  • Are mixed use drives going to be able to meet capacity demands?
  • What's the best bang for the buck hardware to meet workload requirements?
In a workload that favors capacity and read intensive workloads, I would favor vSAN OSA. For performance, ESA should absolutely be a consideration. And if you have the chance to get more nodes, the capacity and performance improvements tend to favor ESA.


Monday, May 8, 2023

HCIBench analysis part 1: OSA vs. OSA with Intel Optane

In my previous post, I shared my current vSAN setup details. In this post, we'll take a look at the performance of the original vSAN deployment, and see how much of a performance difference Optane can make when we replace sub-optimal cache disks with Optane for OSA, followed by a full Optane and ESA redeployment.

As previously stated, the cache disks that I have in my current vSAN OSA 2 node cluster are not optimized for caching as they are read intensive disks, and they are mismatched capacity. When running vSAN in a production environment, it is best to adhere to the vSAN HCL as well as the appropriate disks for cache and capacity. While my 3.84TB read intensive drives will be great for capacity, I should be using a write intensive cache disk. Fortunately, the Intel Optane 905's that were sent to me through the vExpert program and Intel should do the trick.

For benchmarking comparisons, I'm using HCIBench 2.8.1. This free utility is provided by VMware as a "Fling". It is an OVA template that, once deployed, allows us to automatically create Linux based VMs that run preconfigured Flexible I/O (FIO) benchmarks. Throughout the benchmarking process, I have selected "Easy Run", which will automatically deploy the number of VMs it feels is correct based on my hardware configuration.

The first thing I did was select the default benchmarks and deploy each on the original vSAN OSA configuration. The "Easy Run" mode determined it would be best to deploy 4 VMs, as I suspect the cache wasn't up to par. 

Of note, all OSA benchmarks were run with deduplication and compression disabled.  


Here's how it went:

100% read, 4KB random


This is decent, but expected considering all of the disks are read intensive. 


70% read, 4KB random


This is more of a realistic bench, with some write performance metrics. Read latency is pretty high.


50% read/write, 8KB random


This simulates database workloads with an equal mix of reads and writes. With the larger block size, performance improves a bit, but latency remains a concern.


100% write, 256KB sequential


The throughput bench, best for video and media. We come close to saturating the 10Gbe link between the two servers on this one. 


For the next tests, I'll remove the 1.2TB and 1.92TB cache disks and replace them with two of the Intel Optane 905's. These are 280GB each, and have drastically better read and write performance capabilities. I could, in theory, use four cache disks, but vSAN prefers a 1:1 cache to capacity disk ratio. This was also the point where I swapped out the 10Gbe 82599 network card and replaced it with a ConnectX-4 CX455 100Gbe card to ensure we don't run into a bandwidth bottleneck (although I doubt I'll be able to saturate 100Gb). We should see a measurable difference across the board in terms of vSAN OSA performance. 

Of note, when selecting "Easy Run" on the following tests, HCIBench deployed 8 benchmark VMs.

100% read, 4KB random


Here we can see an increase of 200K IOPS. Despite the read intensive nature of the original disks, the Optane disks are rated higher for reads and substantially higher for writes. I'm not sure why the results failed to capture the 95th percentile read latency, but I would expect it to be similar to the original OSA result


70% read, 4KB random


Unsurprisingly, the write performance improved dramatically, as well as read latency. 188K IOPS at 70/30 for a 2 node cluster is impressive.


50% read/write, 8KB random


Once again, we see the difference in performance thanks to the Optane drives. 172K IOPS and much lower latency.


100% write, 256KB sequential


This was surprising for me. Just by replacing the cache disks, we can see a near 3.5x bandwidth increase. We see that it would've more than saturated the 10Gbe link, so switching to the 100Gbe card gave us a better idea of what to expect. Average write latency also improved considerably!

Overall, we can see a clear advantage in using the Intel Optane disks. It is critical to choose a cache disk that excels in write intensive workloads, as "hot tier" data gets pushed to capacity over time. By contrast, ESA excels with uniform, mixed use disks. We've seen that Optane has impressive write capabilities, but it also has great read performance. Optane can do it all, but what will the HCIBench numbers reflect? Stay tuned for my next blog post, where we'll compare vSAN OSA with 4 Optane cache/4 capacity disks to the ESA with 10 Optane disks test. 

Tuesday, May 2, 2023

My current setup: vSAN OSA 2 node cluster

I'm excited to announce that I was selected for the vExpert Intel Optane giveaway. To prepare for the incoming drives, I've started a series of blog posts focusing on benchmarking my two-node vSAN cluster. This will serve as a baseline of what to expect in terms of differences between using best practices for OSA as well as the fundamental performance differences of ESA.

My BOM consists of:

Supermicro BigTwin 6029BT-DNC0R
2x X11DPT-B compute servers (OEM branded), each containing:
  • 2x Xeon Silver 4116
  • 768GB DDR4 (24x32GB)
  • Intel X550 RJ-45 10Gbe dual port SIOM network card
  • RSC riser to break up x16 slot into 2 x8
  • Intel 82599 SFP+ 10Gbe dual-port network card in slot 1 of the riser
  • 10Gtek PCI-e x8 to 2x U.2 NVMe drive adapter in slot 2 of the riser
  • Open PCI-e x16 low-profile slot
  • Backplane supports 2x U.2 NVMe with 4 SAS/SATA HDD/SSD per server
Each node contains a single NVMe cache disk along with two NVMe drives for capacity. The drive list is as follows:
  • Node 1: Intel DC P3500 1.2TB for cache, 2x SanDisk Skyhawk 3.84TB for capacity
  • Node 2: SanDisk Skyhawk 1.92TB for cache, 2x SanDisk Skyhawk 3.84TB for capacity
The cache disks are not recommended for two reasons: They are mismatched in size, and they are not write-intensive disks. Nevertheless, they are what I have on hand and should be enough to establish a baseline of vSAN OSA performance. 

The first port of the X550 will be used for management and VM traffic (green lines), and the second will be used for vSAN witness traffic (blue lines). I didn't have a switch capable of handling VLANs, so this will run over two "dumb" 8-port switches. The servers will be direct-connected over the 82599 network cards to pass vSAN storage traffic (red line).


Once we have benchmarked the original build, the plan is to swap the cache disks with Optane drives for OSA, then use them all for ESA. With the 10Gtek cards, each server can hold a maximum of 6 NVMe disks. vSAN OSA prefers to have a 1:1 cache-to-capacity disk ratio, so we will test with 2x Optane and 2x capacity disks, followed by 5x Optane for ESA. To make room for the second NVMe adapter, I'm going to use a ConnectX-4 100Gbe adapter in the open x16 slot for testing, while it is overkill, I don't want there to be a bottleneck (and the original build won't likely saturate the 10Gbe link currently in place). The latest HCIBench utility as of this writing is 2.8.1 and will be utilized in "easy run" mode. Stay tuned!


Monday, March 20, 2023

Adding 10Gbe networking to the Lenovo ThinkCentre M75q Gen 2

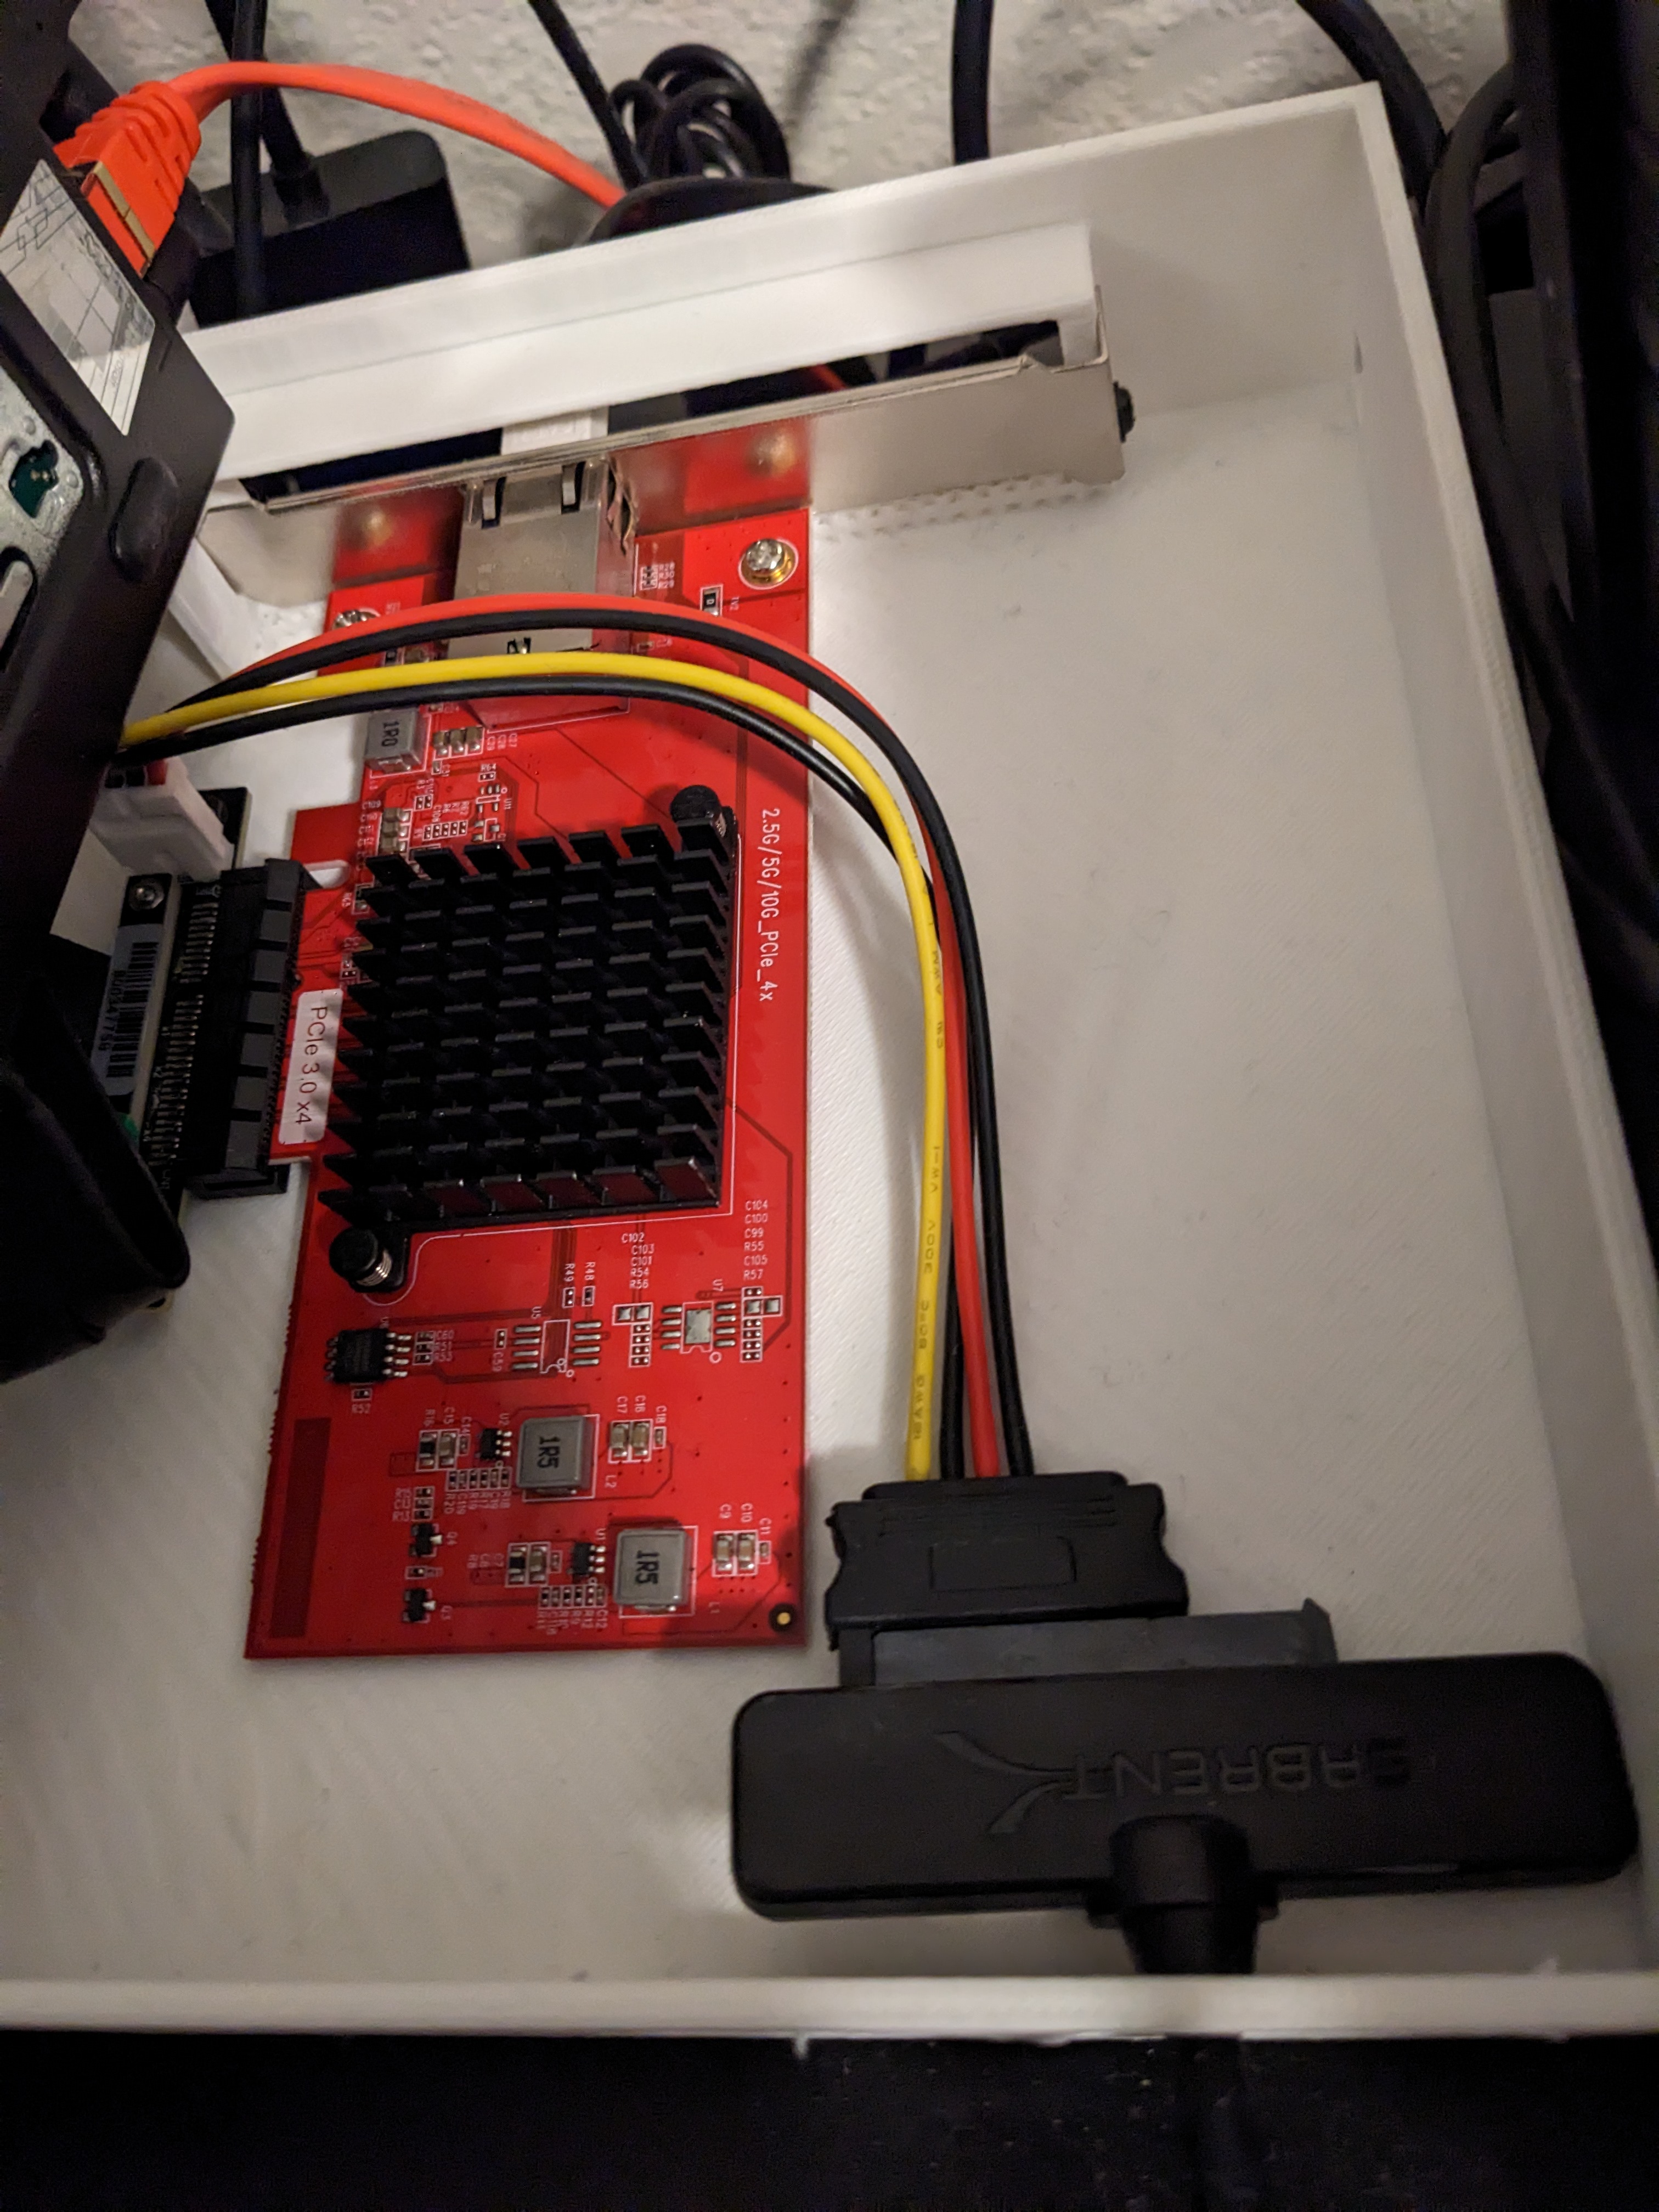
 This post has been a process, but finally, I'm happy to report that 10Gbe works on the M75q Gen 2 and also with ESXi 7.0. There were several challenges that needed to be addressed:

  • No PCI-e slot
  • No expansion chassis
  • Only 1x SATA and 1x NVMe
  • Realtek NIC onboard

The reason I wanted to use this system is because of how compute dense it is for the form factor - a <1L system that houses 8 Ryzen cores and 64GB of DDR4 would make a great power sipping small box for the homelab; adding 10Gbe networking would allow it a better storage option for VM consumption. I've addressed how to overcome the Realtek NIC in a previous blog post by utilizing the USB fling, now we'll cover what it takes to add the 10Gbe card.

Our BOM is as follows:

The case extender was designed by me, which allows a single slot PCI-e card to be installed and has a hole on the side to allow a screw driver to affix an M3 screw to secure the card, and a slot in the back to pass the USB to SATA cable through.


Once the card has been connected, ESXi can be booted and the card should be recognized:


The only real issue that I've run into so far is what cards are supported by this setup. I have an Intel X550 (Lenovo OEM) which physically fits the slot, but wasn't detected on boot. I assume this is a power delivery limitation, as I doubt the USB adapter can provide enough juice. I would like to test the quad port Intel i225 card provided by QNAP, and may do so in the future as having supported NICs would make booting this much easier.

Tuesday, February 21, 2023

VMware Cloud Professional certification - thoughts and tips to pass

 I recently passed the VCP-VMC 2023 exam, which was made possible by the free VMware course that allowed me to check the prerequisite for the certification. For those looking to take on the exam, I'll include what I can remember in terms of general concepts.

For starters, and as per usual with any VMware exam, start with the exam guide.

Like anything to do with cloud, it is network heavy. I'm not a networking engineer but have a long-since lapsed CCENT certification. This exam is going to grill you on CIDR, subnets, and network overlaps, and assumes that you have a general knowledge of the OSI model. Focus as well on the different connection and VPN types for each cloud provider. While it primarily focuses on AWS, GCP and Azure questions were in there as well, so be sure to know what each provider supports for configuration minimums and maximums regarding management networking configuration.

Speaking of minimums and maximums, you'll want to read up on cluster sizes and hardware configurations. What are the specs of an i3.metal instance vs. an i3en.metal? What kind of nodes can you get with Azure and GCP? And how many can you throw into a cluster? All of these may appear on the exam.

Managed services, such as VMware Cloud on Dell EMC and AWS Outposts should be studied as well. What physical requirements do these carry? What are their responsibilities?

HCX... woo boy. Several of these questions showed up, and did nothing but generate anxiety. Get to know HCX. Get to know the deployment models, and read up on how to troubleshoot different scenarios.

Containers, Kubernetes and Tanzu all showed up on my exam. Know what TKG does, how to deploy it, what value Kubernetes brings to containers in general, and what Tanzu services do what function.

That's all I can remember as of this moment. I'm still kind of pumped from getting through it. The only feedback that I have is that I don't know if some of my answers were right as they may have changed after the exam was written. For instance, Google has updated their networking requirements as of November 2022, so I'm not sure if I got the question wrong by answering based on current requirements, or if I should've answered based on previous specs. Perhaps a higher-level question that isn't dependent on something that can change with relative frequency would be better.

I hope you found this helpful. Feel free to comment below or ping me on Twitter if you have any questions!

Friday, February 17, 2023

vSphere 8.0 2023 homelab buyer's guide

The hardware market has started to recover, and with vSphere 8.0 introducing native support for the excellent Intel i226-V network card, some new contenders have arrived in terms of price to performance that generally should be able to run ESXi. This post will focus on several categories, including mini PCs, second hand workstations and servers, and whitebox builds that should meet the requirements of the updated HCL. Let's get started!


Mini PCs

NUC like systems are a classic piece in the homelab. Historically, the tradeoff has been limited network connectivity and/or lack of compute/memory density. Now, however, there are some exceptions to the rule. 

Topton, a 6 year old shop on AliExpress, has an AMD Ryzen 5000 series based "router" which grants 6 to 8 cores, up to 64GB of RAM, 3x M.2 NVMe slots, and four i226-V based 2.5Gbe ports. With an entry point of $346 USD at the time of this writing, along with a claimed capability to ship VAT/Tax free (not verified, YMMV), this looks like it could be the value king mini PC of 2023. Be wary of copycat shops who may offer similar specs at a higher discount; ensure that the store has been around for some time as not every seller can be trusted. Intel based systems can also be found with similar specs (minus the awesome core count, of course) for ~$200 USD for super cheap vSAN clusters. 

Sadly, mini PCs still suffer from a lack of PCI lanes, but I found a creative way around this... that's reserved for a follow up blog.


Second hand workstations

With buying cycles slowing down in an uncertain economy, second hand hardware is getting harder and harder to come by. Workstations, however, are sometimes offered up on eBay for a deep discount. Most of the hardware in these are supported by ESXi, with perhaps an exception for the onboard network card. Fortunately, to make up for this, they have several PCI-E slots, so adding a supported NIC isn't too much of a hassle.

The Dell Precision T7820 and T7920 can sometimes be found with Xeon Bronze or Silver processors in the sub $500 USD range. Recently, I saw a 2x Silver with 64GB of RAM listed for $350 USD. The HP equivalent Z6 G4 and Z8 G4 can be found for similar price points. Both of these *should* come with an Intel based on board NIC according to their drivers on their respective support pages. Be wary of barebone kits, as these systems do not have onboard graphics - a barebone system with no GPU will require a graphics card to function properly.

Looking forward to the future of Threadripper based workstations - The Dell Precision 7865 can pack up to 64 cores in a standard ATX tower form factor. Definitely not cheap, but exciting to see nonetheless!


Second hand servers

As of this writing, the same issue that is faced with workstations is impacting servers ten fold. Most hardware vendors are officially ending support for socket 2011-3 based servers, such as PowerEdge 13G, HPE Proliant G9, and Cisco UCS M4 systems. These are also falling out of support with ESXi 8.0, as they were originally introduced in 2014. The next generation of each (14G, G10, M5) are difficult to find on eBay for a decent price. I'll post an update to this in another blog post later this year, as I expect more second hand hardware will drop in price closer to the EOL of the older generations.


White box builds

Building out hardware that is intended for gaming and enthusiast builds has some caveats. Most gaming systems use a Realtek NIC for gigabit or 2.5Gbe networking onboard. These cards are not supported with ESXi as there is no compatible driver. Our options are:

  • Find a board with i226-V onboard (i225 for most gaming boards had many issues, regardless of revision)
  • Add a supported USB NIC with the Fling driver
  • Add a supported PCI-e NIC (and/or HBA if using a CPU with onboard graphics enabled)
AM4 builds that can make use of the Ryzen 7 5700G or Intel builds with onboard graphics can allow for multiple supported network cards. Enthusiast boards, such as the B550, have many of the similar options you'd expect to see on a server board regarding BIOS options. If you want to add in KVM-like capabilities, you can also invest in a Raspberry Pi based PiKVM solution that can allow for remote out of band management, but these cost quite a bit for a quality of life feature.
SuperMicro also has some relatively cost effective hardware available second hand on eBay, such as the H11SSL motherboard at $400 USD, which supports 8-32 cores (or up to 64 if it's revision 2.0), although you still need to factor in the cost of a heatsink, CPU and ECC memory.

Tuesday, January 3, 2023

Installing Ansible on CentOS for vSphere First Class Disks

I've been wanting to play with first class disks for some time now, and needed a means of doing so. While there are many ways to interact with vSphere APIs, Ansible provides a means of automation that has some key advantages (primarily in that it is free). This post will get us started on installing Ansible in a CentOS 9 environment, as well as installing the VMware Community modules and deploying a runbook that will create a first class disk.

The first thing we'll need to do is install Ansible. With CentOS 9, we'll need to add a repository in order to install it.

sudo yum install epel-release
sudo yum update
sudo yum install ansible
Once installed, we'll need to install some additional modules - python package manager (pip3), python SDK for VMware API (PyVmomi), and the VMware Ansible collection:

sudo yum install python3-pip -y
pip3 install PyVmomi
ansible-galaxy collection install vmware.vmware_rest
Once complete, we can work on updating our Ansible hosts file and write our first playbook. The hosts file for Ansible is located at /etc/ansible/hosts. Using the text editor of your choice, add the hostname or IP address of your vCenter server to the last line of the file.

To prepare the VMware environment, ensure that SSH is enabled on both the vCenter server and host(s) that you plan on running the playbook against. I took the extra step of starting an SSH session to each (root@vCenterIP and root@ESXiHostIP) to log the key thumbprint for each; while this may not be necessary, it's a force of habit for me.

Finally, it's time to write the First Class Disk playbook. The playbook will create a 1GB FCD based VMDK onto the datastore of our choosing. This will require the vCenter username and password. While I suggest using a variable file to store this information (shorthand "vars"), for the purpose of this example I will use plain text. I used the command "vi fcd.yml" and wrote the following:

- name: FCD
  hosts: localhost
  become: false
  gather_facts: false
  collections:
    - community.vmware
  tasks:
    - name: create disk
      vmware_first_class_disk:
        hostname: '(vCenter IP address or FQDN)'
        username: 'administrator@vsphere.local'
        password: '(enter password here)'
        validate_certs: no
        datastore_name: 'Datastore1'
        disk_name: '1GBDisk'
        size: '1GB'
        state: present
      delegate_to: localhost

Let's break this down a bit:
Hostname: Use the vCenter IP address or FQDN.
Username: Typically administrator@vsphere.local but can be a domain account. Note that as we are carrying out a vSphere action, we do not want to use "root" here.
Password: The password for the above username.
validate_certs: This was a work around for an error that I received when first trying to run the playbook. There may be other ways around it, but adding this line seems to do the trick.
disk_name: I'm not entirely certain this variable works, but it is called out in the Ansible example.

Once this is written, we can execute the playbook with: ansible-playbook fcd.yml
This should yield the following result:

PLAY [FCD] *********************************************************************

TASK [create disk] *************************************************************
ok: [localhost]

PLAY RECAP *********************************************************************
localhost                  : ok=1    changed=0    unreachable=0    failed=0    skipped=0    rescued=0    ignored=0
When we log into vCenter, a new folder on the target datastore should have a label of "fcd", and we can see the new VMDK:


Realtek network driver working with ESXi 8.0

 One of my older homelab hosts has been chugging along for a few years now. The Lenovo Thinkcentre M75q Gen 2 has served me well, and while ...