Sunday, November 16, 2025

Realtek network driver working with ESXi 8.0

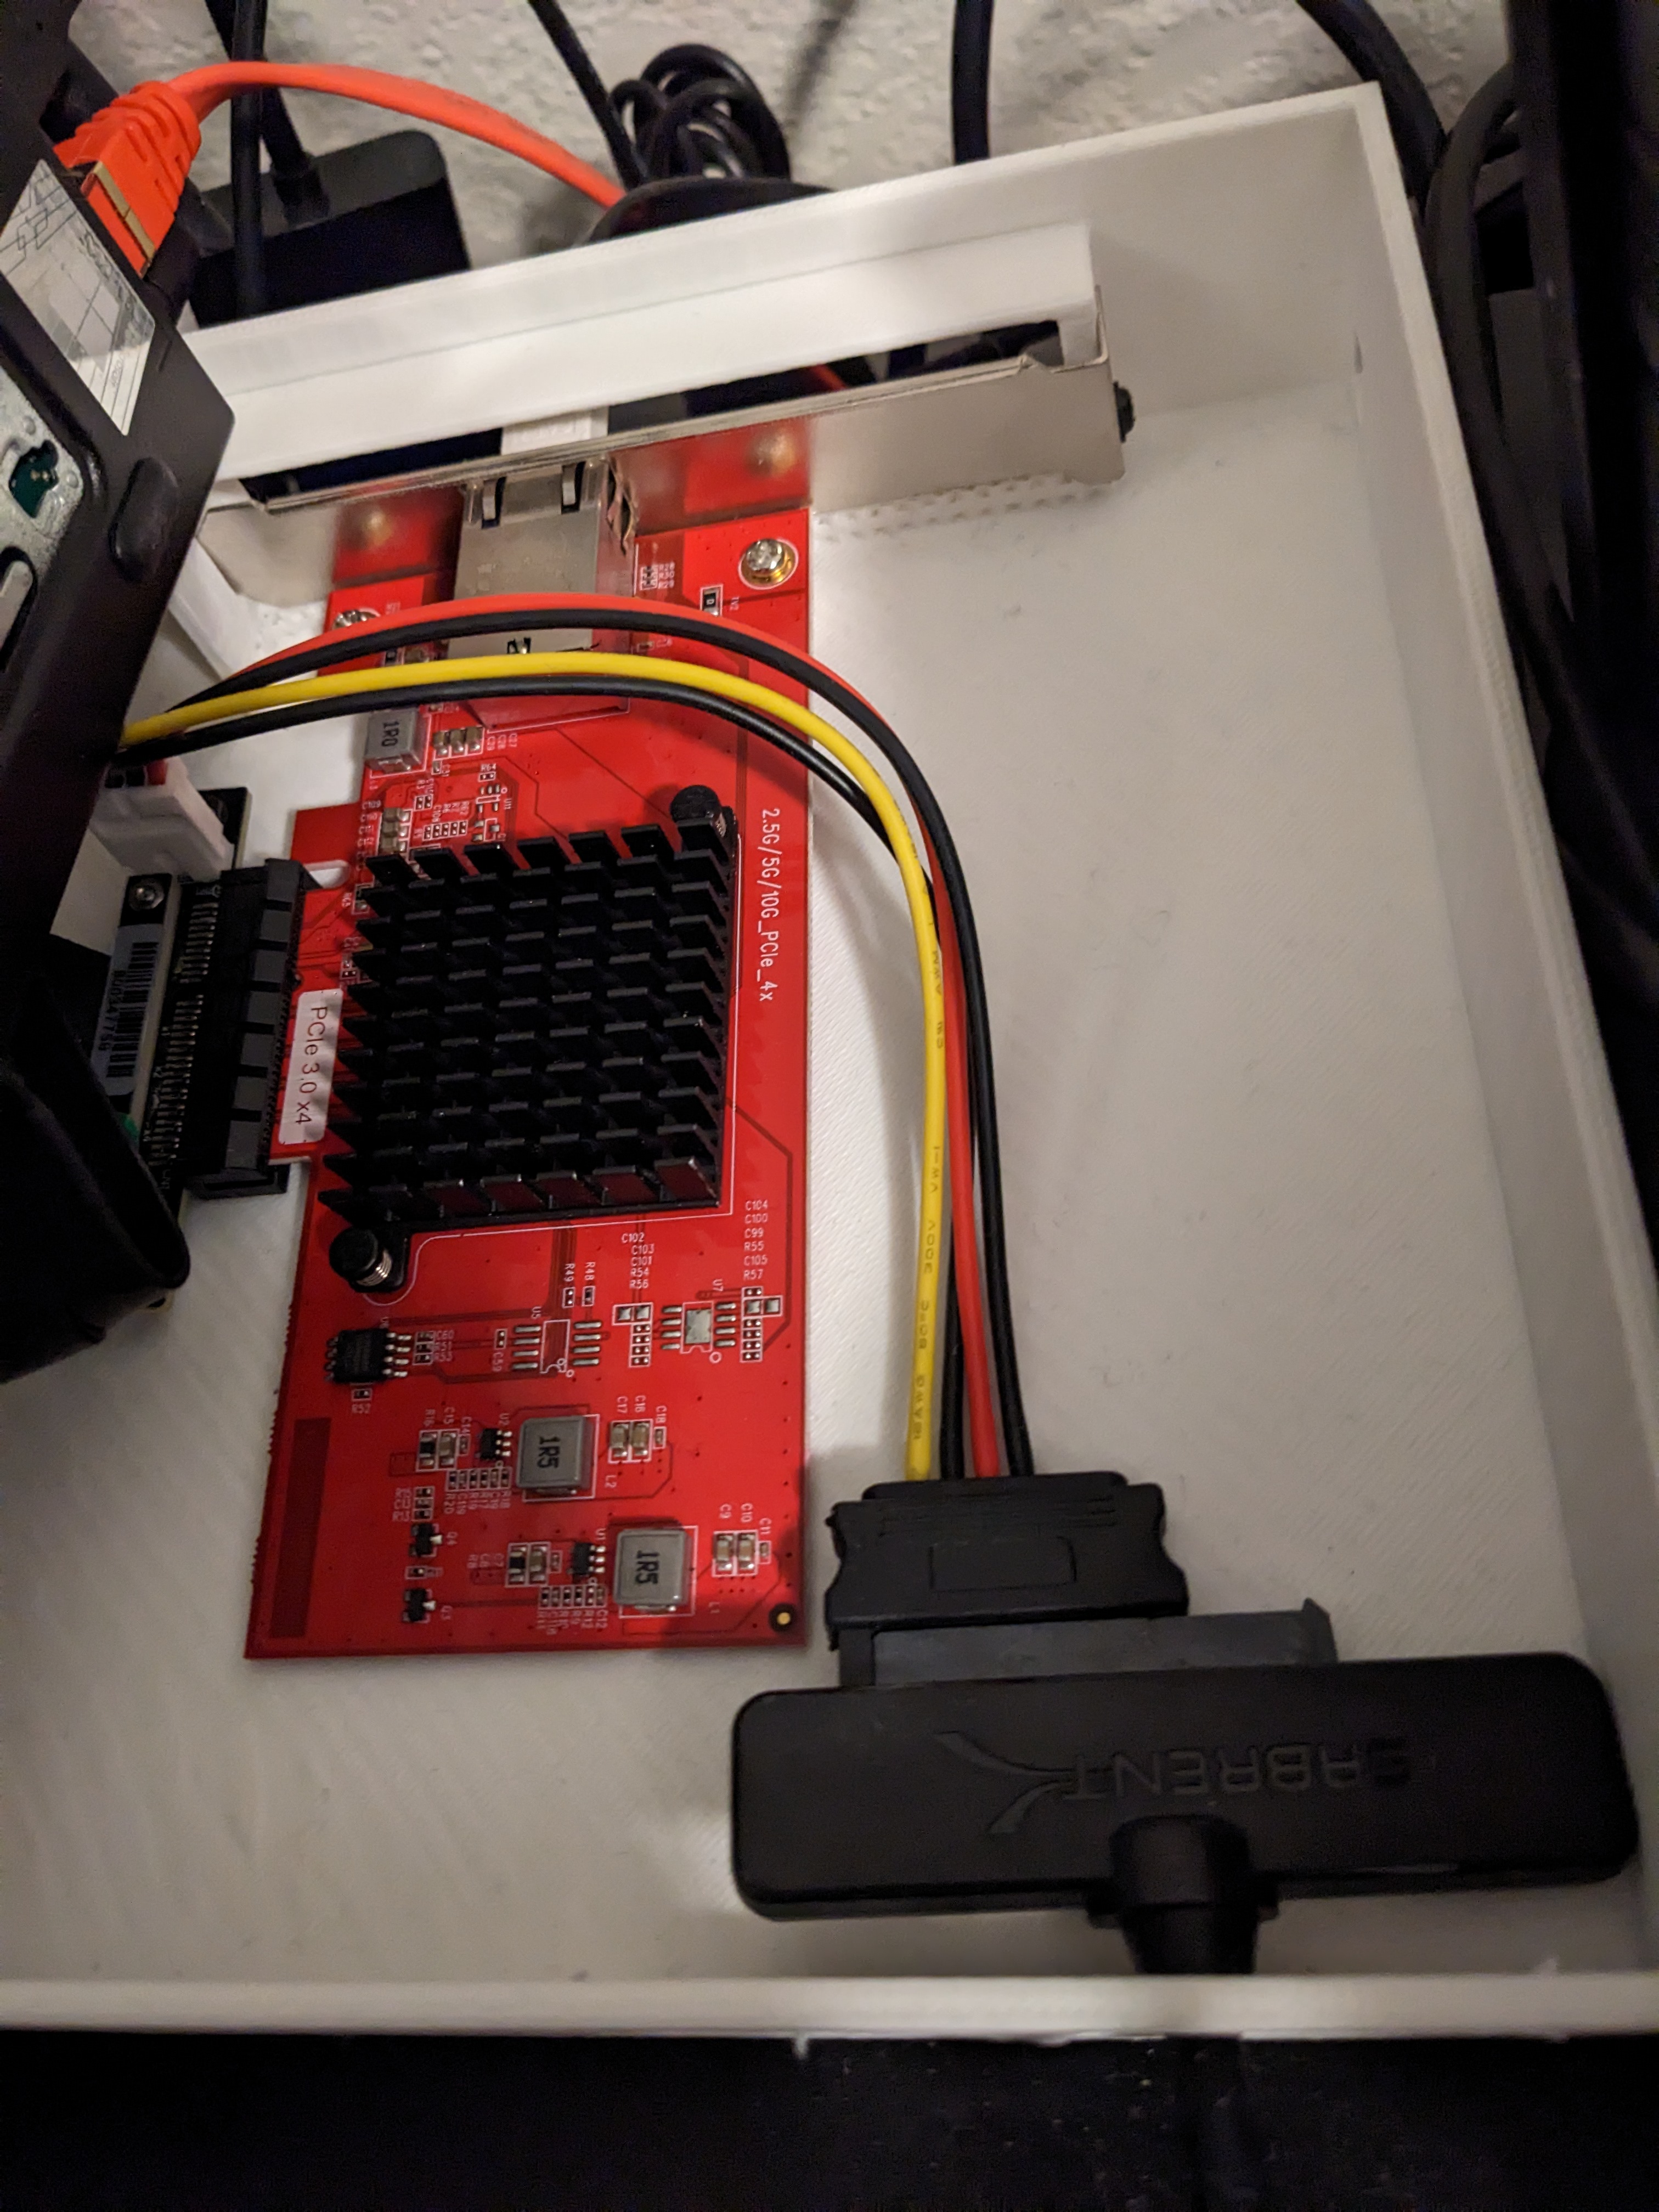
 One of my older homelab hosts has been chugging along for a few years now. The Lenovo Thinkcentre M75q Gen 2 has served me well, and while most of the components are supported in 7.0 and even 8.0, I had to stay on 6.7 due to the fact that it had an onboard Realtek 8111 network adapter. Other boxes that I have with the same issue have worked with the community driver and USB network adapters, and at one point I had 10Gbe networking through an M.2 to PCI-e x4 adapter.

 Earlier this week, William Lam announced that the Realtek network driver fling had been released. This opens the door to update the M75q to 8.0 without having additional hardware hanging off the back. In this instance, I want to build an image that injects the driver into the update bundle. Here are the steps I took to do so:

Prerequisites:

  • PowerCLI 13.x (VCF PowerCli is more current but will address the legacy use later)
  • ESXi-Customizer-PS script 
  • ESXi 8.0 Update 3e free edition (or a depot of your preferred version)


At first, I tried using VCF PowerCli as it's easy to install within PowerShell. I updated the ESXi-Customizer-PS script to reference it, but when trying to build the image, it kept giving me an error saying "node doesn't share the same root with the depot file". The same thing happened when trying to use the official method with Export-ESXImageProfile. Switching back to the legacy PowerCli worked, so if you run into issues, try reverting to the older version.

From there, I put my depot and script into a folder, and created another named "Realtek" one level down. I put the Realtek driver fling in the Realtek folder, and ran the following command:

  •  .\ESXi-Customizer-PS.ps1 -izip .\Depot-name.zip -pkgDir .\Realtek -ozip  

The only thing left to do is install the update and remove the legacy Realtek driver. I uploaded the newly created depot to the datastore of the 6.7 host, and went for a profile update. Before I could proceed, I needed to remove the legacy Realtek driver:

  • esxcli software vib remove -n net55-r8168

Next:

  • esxcli software sources profile list -d /vmfs/volumes/datastore1/Depot.zip

Where Depot.zip is the name of the uploaded file. Make note of the profile, then:

  • esxcli software profile update -d /vmfs/volumes/datastore1/Depot.zip -p (name of profile noted in last step)

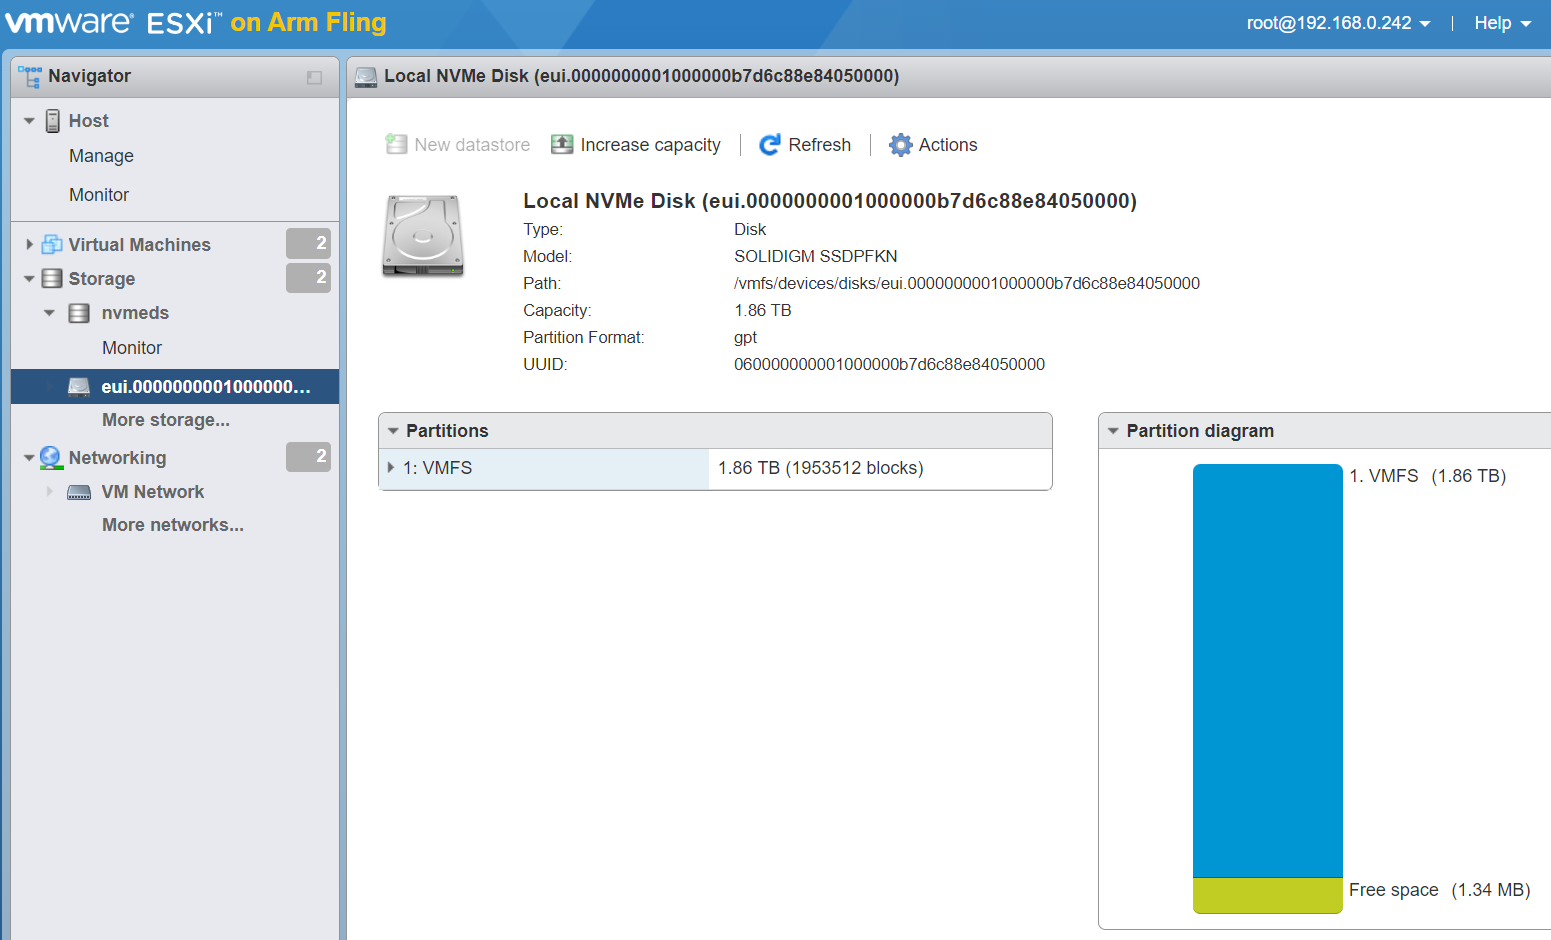
Once complete, reboot. I was able to confirm that the if-re driver was operational:


Wednesday, September 24, 2025

My journey with homelab inferencing part 1 - objectives, planning and cost

 Building a machine that can handle a local LLM isn't too difficult, but can be cost prohibitive. My journey to build a machine that can handle distilled, decent-sized models was motivated by having a completely offline voice assistant for Home Assistant - an open-source software for smart home management. My requirements for this project were as follows:

  • No subscriptions
  • Full ownership
  • Minimal cloud service connectivity
  • Keep cost down as much as possible
Since I have most of the components to build the machine already, the main thing to consider was picking a graphics card. The sweet spot in terms of performance per dollar is the NVIDIA RTX 3090 (Ti). Both the Ti and non-Ti versions of the card support 24GB of vRAM, which will fit most ~32B models. There are GPUs with more vRAM onboard, as well as multi-GPU capable systems, but the cost ramps up significantly when those are in play. Because this is a very specific use case, I don't need a lot of context - I just need it to be "smart" enough to carry out basic Home Assistant actions when asked.

As of this writing, RTX 3090's can be obtained for around $800 used on eBay. Let's draw up some pros and cons compared to subscribing to LLM as a Service offerings.

The pros are:
  • Full ownership and customization of hardware
    • No subscriptions, pay once and it's yours
  • Use whichever model you wish... 
    • ...as long as it fits in vRAM
    • Can add more hardware to run larger models
  • No internet connection required
  • Hardware can be repurposed for other projects (gaming, Folding @ Home, etc)
The cons are:
  • Steep upfront cost (LLMaaS such as ChatGPT Plus is $20/month at the time of this writing)
  • Need to decide on OS and deployment model
    • LLMaaS is turn-key and ready at a moment's notice
  • vRAM limits the size of models that can be used 
    • LLMaaS grants full size models with RAG customization
    • More GPUs can be used but increases power and cost significantly
  • Risk of hardware deprecation (RTX 3090 is two generations old and may not be able to run future models)
    • LLMaaS provides the latest models and additional features, such as advanced image generation
At the end of the day, you need to determine where you want your flexibility. Do you want flexibility in LLM capabilities, or in the hardware aspect of the stack? At $800 plus the cost of hardware, you're looking at a 40-month ROI compared to LLMaaS, with less context and capabilities. Again, for my use case, this is fine, but for a general purpose chat bot you might prefer the monthly subscription. In my next blog, I plan on covering the next stage of local LLM: OS install and containerized deployment.

Monday, December 30, 2024

ESXi on ARM 2.1 - Broadcom 5719 and USB NICs working on vSphere 8.0

 Let's sneak one more blog post in before the new year! Last week, the ESXi on ARM version 2.1 released, which reintroduced the USB NIC driver, as well as some other fixes. One item on the change log caught my attention:

  •     Fix ntg3 driver support (experimental)


This fix might address the purple screen issue I documented in my previous blog post. This coincides with the 0.12 release of the edk2-rk3588 firmware, so we'll load that as well. The updated BOM is as follows:

Orange Pi 5 Plus


With that out of the way, we can get to work on installing ESXi. For the initial install, I'm going to use one of the USB network adapters for the management traffic, as the BCM5719 isn't going to work right off the bat. Part of this is because of Rockchip erratum 3588001. While this adapter will work in other computers and operating systems, for some reason, the driver does not automatically switch to legacy interrupts if MSI isn't working. In my previous blog post, I found that disabling MSI at the driver level led to a purple screen, which then led to a conversation with Cyprien Laplace about the driver itself. The fixed driver appears to have resolved this issue, as I can now boot into ESXi and even use the 5719 network ports:

To disable MSI and use legacy interrupts at the driver level, I ran the following command then rebooted the host:
    esxcli system module parameters set -m ntg3 -p intrMode=0

On reboot, the network adapters now show up in ESXi, and are usable, at least for management traffic. I haven't stress tested the adapter, but it's encouraging to see the flexibility that ESXi on ARM 2.1 offers for experimental edge use cases. The progress of both the ESXi-ARM and edk2-rk3588 projects has been tremendous, and I'm looking forward to pushing some virtual machines onto this system once more :)

Friday, December 6, 2024

ESXi on ARM Fling 2.0 - Challenges with the vSphere 8.0 update

TL;DR - if you're using an Orange Pi 5 Plus or Raspberry Pi 4/5, you might want to stick with 1.15/7.0.


Apologies for the lack of updates. I've run into more issues trying to get VCF running on the embedded AMD EPYC build. With ESXi on ARM Fling 2.0 released, the base hypervisor has been upgraded to ESXi 8.0 Update 3b. I haven't had much luck with it as the release does not include the USB NIC community driver that the 7.0/1.15 release had. This limits us to exactly one USB NIC, that will only work at 100Mb/s. The onboard network adapter for the Raspberry Pi 5 is a different model than the 4, and as such is not compatible with the uether driver.

Tested BOMs:

Orange Pi 5 Plus

Raspberry Pi 5

With the Orange Pi 5 Plus, the issue first appeared to be related to MSI-X. In previous blog posts, I had to disable MSI interrupts to get NVMe drives to work. The behavior witnessed with Arm Fling 2.0 is that if MSI is disabled with a NIC, it simply disabled the device. In UEFI release 0.9.1, there were some messages indicating that MSIX interrupts were still being allocated:
VMK_PCI: 599: 0000:01:00.0: allocated 3 MSIX interrupts

These messages were also accompanied by TX and RX hangs. While the link light remained up, I could not pull a DHCP address on any card that I tried. 

I'm not sure about everything that changed between 0.9.1 and 0.11.2, but when I attempted it on the latest version, there were no messages indicating MSIX interrupts, yet the behavior remained the same; link light, no DHCP, tx/rx hangs.

With the Broadcom 5719, the ntg3 module has an advanced parameter to enable legacy interrupts. I disabled MSI interrupts, enabled legacy with the driver, only for it to purple screen on boot. None of the Intel modules have this option. I've documented all of these issues on the Broadcom forum, in this topic.

With the Raspberry Pi 5, I ran into similar issues, with messaging indicating "Failed to allocate MSI interrupts". There has been significant development for Linux on RPi5, but the UEFI build has stagnated, as the primary contributors have shifted their focus to RK3588 based SBCs.

I believe the path forward will be with the Orange Pi 5 Plus. The only thing left to test is with an enterprise-grade i210 network adapter. I ordered a used Dell-based i210-T1 which should be here soon. This adapter has been proven to work with Ampere based servers, and the hope is that something with the device firmware will prevent the tx/rx hang issues. If it doesn't resolve the problem, I'll have to hurry up and wait on the USB NIC fling to be re-introduced to the ARM fling. For now, I'm going to stay on the 7.0 release.

Thursday, August 29, 2024

Using Intel Optane for NVMe Tiering

 A series of unfortunate events occurred shortly after posting the previous blog post:

  • DIMM H1 decided to fail
  • Replacement was ordered
  • Post office lost the replacement
The joys of homelabbing :) These things happen. While I wait for the replacement for the replacement, a new feature that was introduced in vSphere 8.0 Update 3 was brought to my attention. William Lam posted a blog covering NVMe tiering, currently in tech preview, that allows NVMe devices to act as RAM for inactive pages.

This does mean that I'll need to disrupt my current vSAN deployment. This can be utilized without vCenter. My plan is to utilize one of the NVMe devices to provide effectively triple the RAM that is currently in the system.

As it stands, I have 128GB installed, 112GB usable as H1 left the lobby. By following William Lam's blog, I configured the host with the following commands:

esxcli system settings kernel set -s MemoryTiering -v TRUE

esxcli system tierdevice create -d /vmfs/devices/disks/t10.NVMe____SSDPE21D280GAD_NVME_INTEL_280GB_________0001B33DC1E4D25C

esxcli system settings advanced set -o /Mem/TierNvmePct -i 200

Then rebooted the host. On boot, the increased RAM is realized:

This should provide enough breathing room to attempt a single node VCF deployment. This does change my original plan a little bit, but hopefully I can perform an embedded 5.2 install with supported principal storage. Stay tuned!

Monday, August 19, 2024

Revisiting the vExpert Intel Optane drives - single node vSAN ESA the "hard" way

Hello, internet! Long time no see, how you been? It's been a pretty interesting year so far, and the homelab has not been spared from the chaos; hardware failures and upgrades have caused my projects to come to a standstill. Fortunately, I've made headway by consolidating some of the hardware into a project I've been trying to get online for some time now.

I hit a stroke of luck by winning an AMD based Supermicro motherboard off of my favorite auction site, which came with a processor and some memory for about $300. The large number of PCI-e lanes opens up a number of expansion options in a standard mid-tower case. In this blog, I'm going to discuss consolidating all ten of the Intel Optane disks that I received last year into one compute node, and detail the process of getting the latest versions of ESXi and vCenter Server installed.


My BOM:

H11SSL-i - each PCI-e slot configured for x4x4 or x4x4x4x4 bifurcation

AMD EPYC 7551

128GB (8x16GB) 2133 DDR4 RAM

10x Intel Optane 280GB NVMe SSDs (vSAN pool)

5x 10Gtek PCI-e x8 to 2x U.2 NVMe adapters

Solidigm P41 Plus 2TB M.2 NVMe SSD (boot disk)

Corsair RM1000x PSU

Silverstone CS380 8 bay mid-tower case

Noctua NH-U9 TR4-SP3 heatsink


This system will consume the same Optane drives that I used in my Supermicro BigTwin SuperServer, which comprised of two X11DPT-B boards, each containing 2x Xeon Platinum 8160's and 768GB of RAM. The previous vSAN ESA build gave 5 of the Optane drives to each node, a vSAN Witness VM on a third node, and 100Gbe direct connect to share bandwidth. 

Consolidating down to the tower will be considerably quieter and draw less power, while allowing us to benchmark all ten drives without networking overhead. Downsides include less processing power, far less memory, and a little more work to do under the hood to get it working. Unlike the two node cluster, this will have no redundancy.

I'm going to detail how to accomplish all of this without a vSphere license of any kind; this will utilize the 60 day trial license, and a copy of ESXi that was acquired through supported means. Some of the old tricks of standing up a vSAN node still work with ESA, and can be deployed without vCenter.


As most of my blog posts go, this is strictly for lab use - I would not suggest running a single node vSAN cluster in production, nor would I suggest running a vSAN cluster without a proper vCenter server. We will install vCenter in a later blog post.


The first step is to download the ESXi-Customizer-PS script. This can be found here: https://github.com/VFrontDe-Org/ESXi-Customizer-PS/tree/master

PowerCLI is required to use the script. Full documentation on the script can be found here: https://www.v-front.de/p/esxi-customizer-ps.html

Simply running the script without any options will seek out the VMware online depot and create an ISO based on the latest patch version. As of this writing, I can confirm that the script works to download ESXi 8.0 Update 3 build 24022510.

Install the OS to the boot disk, then reboot.

Once booted, clear any partitions that may be on the Optane disks.


Prior to creating the vSAN cluster, we'll want to get a list of the disks that we want to use in the cluster. For my use case, I was able to run the command "esxcli storage core device list | grep t10" to list out all NVMe drives. I removed my 2TB boot disk from that output.

Since we're using a single node vSAN cluster, we can create a vSwitch with no uplinks for the purpose of vSAN networking:

  • Create vSwitch
  • Add vmkernel port
  • From an SSH session, mark the vmkernel port for vSAN traffic: esxcli vsan network ip add -i vmk1
Previously, we would use the command "esxcli vsan cluster new" to create a vSAN OSA cluster. With 8.0, we have more options:

[root@localhost:~] esxcli vsan cluster new --help
Usage: esxcli vsan cluster new [cmd options]

Description:
  new                   Create a vSAN cluster with current host joined. A random
                        sub-cluster UUID will be generated.

Cmd options:
  -c|--client-mode      vSAN client mode allows mount of vSAN datastore from the
                        server cluster without enabling vSAN.
  -s|--storage-mode     vSAN storage mode allows to create a vSAN Max cluster.
  -x|--vsanesa          vSAN ESA mode allows to create a vSAN ESA cluster.

By using the -x option, we can create the ESA cluster: esxcli vsan cluster new -x

We can then add disks to the storage pool with: "esxcli vsan storagepool add" then specify the disks that we want to use by adding the -d option to each device we listed previously. 

For example, the command should read: "esxcli vsan storagepool add -d t10.longnumbergoeshere1 -d t10.longnumbergoeshere2", repeating for each device you wish to add.

This will take a few minutes, but once it is complete, we should have a vSAN datastore:


We won't be able to use this datastore quite yet; a little more housekeeping is in order. Because the default storage policy can only be changed by vCenter, we need to update the policy to tolerate 0 failures. To do so, run the following commands:

esxcli vsan policy setdefault -c cluster -p "((\"hostFailures
ToTolerate\" i0) (\"forceProvisioning\" i1))"

esxcli vsan policy setdefault -c vdisk -p "((\"hostFailuresTo
Tolerate\" i0) (\"forceProvisioning\" i1))"

esxcli vsan policy setdefault -c vmnamespace -p "((\"hostFail
uresToTolerate\" i0) (\"forceProvisioning\" i1))"

esxcli vsan policy setdefault -c vmswap -p "((\"hostFailuresT
oTolerate\" i0) (\"forceProvisioning\" i1))"

esxcli vsan policy setdefault -c vmem -p "((\"hostFailuresToT
olerate\" i0) (\"forceProvisioning\" i1))"

Once these commands have been run, we should be able to create virtual machines on the vSAN datastore. We are now ready for a vCenter install and HCIBench testing. This also primes a VMware Cloud Foundation single node lab deployment. For now, we'll call this entry done and cover HCIBench in the next one.

Sunday, February 18, 2024

Evacuate ESXi host without DRS

One of the biggest draws to vSphere Enterprise Plus licensing is the Distributed Resource Scheduler feature. DRS allows for recommendations and automated actions to help balance virtual machine workloads across hosts, as well as affinity rules to keep VMs on or off of specific hosts. 

One of the more common functions is the ability to automatically migrate virtual machines off hosts when they are placed in maintenance mode to perform firmware or hardware upgrades. I set out to create a script that would do this for me on a vSphere Standard license. That script can be found here: https://github.com/ThisGuyFuchs/Evacuate-ESXi-Host-without-DRS

The script is pretty straightforward:

# Connect to vCenter Server
Connect-VIServer -Server "Your-vCenter-Server" -User Your-Username -Password Your-Password

Replace "Your-vCenter-Server" with the IP address or FQDN of your vCenter, as well as the administrator account (mine for example is administrator@vsphere.local) and the password for that account. You can remove -Password if you want it to prompt for it instead.

# Specify the ESXi host to evacuate
$esxiHost = "ESXi-Host-Name"

Replace "ESXi-Host-Name" with the IP address or the FQDN of the host you wish to evacuate.

From there, the script will generate a list of VMs, regardless of power state, and then migrate those VMs to any powered on host in the cluster. Once the script finishes, you are free to put the host into maintenance mode manually, or you can add this step to the script with:

# Put the ESXi host into maintenance mode
Set-VMHost -VMHost $esxiHost -State Maintenance -Confirm:$false

Keep in mind that this will migrate ALL virtual machines, whether they are powered on or off. While this isn't a true replacement to DRS, I find this useful to facilitate firmware updates and add hardware to hosts when needed. Hopefully this can provide additional value to vSphere Standard license holders.

Friday, December 15, 2023

ESXi on Arm: NVMe working on Orange Pi 5 Plus

Recently, a few awesome things have happened. First, the VMware Flings page returned after a short absence. Then, the ESXi on Arm team released an update that brings NVMe support to the Raspberry Pi CM4. This update got me thinking about the issues I had trying to get NVMe working on the Orange Pi 5 Plus. I checked on the edk2-rk3588 project to see if there were any updates, and there were a few that addressed PCI-e. So I flashed my eMMC module to 0.9.1, updated ESXi on Arm to 1.15 and... no dice.


It was at this point that I decided to start actually reading about the problem. Turns out, the issue is occurring because of how the RK3588 chip handles MSI. Erratum 3588001 goes into detail, but the point is that for the edk2-rk3588 project, it was easier to disable MSI than it was to try to fix it. This is what causes the problem that I was experiencing; ESXi will load modules, but will hang at a certain point and fail to boot.


After a bit more research, I found that there's a rather easy work around: kernel options! William Lam has an awesome list of advanced kernel options and lo and behold, there is an option to disable MSI. 


DISCLAIMER: I have no idea what the implications of disabling MSI are in a VMware environment. I offer no warranty. Any change to advanced settings in ESXi has a non-zero chance of wreaking havoc. I would not put any data I care about on the device we're about to configure!

With that out of the way...

I rebooted the Orange Pi and hit shift+O during boot to type:

disableMSI=TRUE

Then hit enter, and let ESXi continue to boot. It was able to get through module load without hanging, and was rewarded with a storage device in the vSphere client:


Created a datastore, made a VM and installed Ubuntu all with no consequence. Great! So now that it works, all we need to do is make the change persistent. To do so, let's check the status of the disableMSI kernel option:

[root@localhost:~] esxcli system settings kernel list -o "disableMSI"
Name        Type  Configured  Runtime  Default  Description
----------  ----  ----------  -------  -------  -----------
disableMSI  Bool  FALSE       TRUE     FALSE    Disable use of MSI/MSI-X
This is what we'd expect to see; runtime is TRUE, but configured is FALSE. Let's fix that with:
esxcli system settings kernel set -s "disableMSI" -v "TRUE"
And then double check with the list command from before:
[root@localhost:~] esxcli system settings kernel list -o "disableMSI"
Name        Type  Configured  Runtime  Default  Description
----------  ----  ----------  -------  -------  -----------
disableMSI  Bool  TRUE        TRUE     FALSE    Disable use of MSI/MSI-X

Now, the kernel option we set should persist through reboots. Good luck and happy homelabbing!


Monday, November 20, 2023

ESXi on Lenovo ThinkCentre M75q Gen 2 part 2 - Adding supported network cards

To follow up on my previous blog post, I've made a few changes to the M75q Gen 2. It can run vSphere 7.0 and 8.0, but is unable to use the onboard NIC as it is a Realtek 8168, which doesn't have a supported driver. With the recent removal of the VMware Flings webpage (archive still exists), the move to supported network adapters is becoming more prudent. While 10Gbe networking is nice, I'd like to expand to perhaps a quad port 2.5Gbe card if possible. If unable to do so, I could perhaps utilize the onboard A+E M.2 slot for a supported gigabit card.

I've optimized the 3D print to allow for a more open air approach to the previous "box" design. This should allow for optimal airflow, at the expense of being able to stack boxes on top of each other. 


Tested and working

As previously mentioned, using the M.2 to PCI-e adapter enables the use of a PCI-e 3.0 x4 slot, with some limitations. The AQC107 based SYBA network card works without issue, establishing a full 10Gbe connection. This card is natively supported as of ESXi 7.0 Update 2.


Tested, limited or uncertain capability

I tested the zimaboard 4x 2.5Gbe i225 network card on the same slot. I was only able to get three of the four ports to work. The fourth port showed link lights even when a cable wasn't connected. I suspected that the issue was with the card on it's own, as the power consumption should be similar to the 10Gbe card. Testing the card in a proper PCI-e slot yielded the same result. DOA parts happen, but I haven't bothered purchasing another to test. If I work up the nerve to try again, I'll order another and post an update, or will try a different brand altogether.

I then tested a Lenovo OEM Intel X550-T2. This is a PCI-e 3.0 x4 card with dual 10Gbe ports. It isn't detected during POST, but works in other systems, which leads me to draw two conclusions:

  1. The power draw of the card is too much, which could be worked around with a different adapter that allows more power (such as a M.2 to Oculink converter with external PSU).
  2. The card has OEM pins that prevent it from being detected during POST, which could be worked around with a tape mod. I'm less inclined to believe this is the case, as it's a Lenovo card going into a Lenovo system, and works in non-OEM machines seamlessly.
As of right now, the card is being used in another system. I might test using the Oculink converter at a later time. The benefit of the Oculink card would mean more compatibility with GPUs, as well as PCI-e 4.0 support for Ryzen 5000 series processors. The downside is that I'd need an external PSU for that purpose.

Tested, not working

The last card I tested was a sketchy looking M.2 A+E to gigabit network adapter. This was a best effort attempt as I have several machines that could use this card. Unfortunately, the M75q Gen 2 did not detect this card at all. If you're going to test this in a compact system, I would suggest getting a A+E extension cable, as the card is wider than most WiFi adapters and may not fit. If/when the Orange Pi 5 Plus supports PCI-e for the ARM fling, I plan on testing this adapter with the extension cable for that purpose.


Overall, I like the Ryzen based, 8 core, 64GB of RAM system for ESXi 6.7 as I can still use the community Realtek driver for it. Nothing in my homelab is essential, but if you wish to learn the capabilities of the latest versions of ESXi, I would suggest against trying to hack a machine to do so. The USB network card fling can be utilized for gigabit to 2.5Gbe connectivity with some success, but for general reliability, stick to Intel based onboard networking with real PCI-e slots or Thunderbolt capabilities. 


Monday, October 30, 2023

Three changes you should be prepared for when upgrading from 6.x

This post outlines some of the impactful changes that come with new versions of vSphere. Sometimes, these changes aren't evident until they're pushed to prod, other times, they creep up and cause problems. As updates are released, I'll publish more topics. For now, these are the main things you should be aware of when upgrading from an ESXi 6.x environment.

The SD card thing
Starting with vSphere 7.0, SD cards and USB boot devices are no longer supported. These devices cannot handle the new partitioning scheme. Unlike 6.x and previous versions, the boot device is now used for logs, which can cause issues when said devices aren't rated for frequent writes. 

The solution is to use a write-intensive local boot disk, or boot from SAN.


vVol minimum size change
In vSphere 8.0 and below, the minimum size for Virtual Volumes is 4GB. Starting with 8.0 Update 1, the size has been updated to 255GB. Any vVols that existed prior to upgrade may disappear, or other errors may occur if you try to make a vVol smaller than 255GB.

The solution is to increase vVols to 255GB or larger, and create new vVols at the same or larger capacity. A workaround exists, which allows the smaller vVols to be used, by using the following command:
esxcli system settings advanced set -o /VVOL/vvolUseVMFS6AndLargeConfigVVols -i 0


CPU Support
An unpleasant surprise awaited me in upgrading to vSphere 8.0 Update 2. The workhorse servers in my homelab are all first generation Xeon Scalable (Skylake), and have been put on notice that they may not be supported in future releases of vSphere. Granted, the processors are 5 years old, but Naples-based AMD EPYC are 6 years and do not have this warning, and Broadwell processors (E5-26xx v4) are still supported as well. 

The solution is to append a boot option when loading ESXi, although this is a band-aid that probably shouldn't be used in production as it may cause instability. Using SHIFT+O prior to module load, use the following: allowLegacyCPU=true

Tuesday, September 5, 2023

Orange Pi 5 Plus ESXi on ARM Fling 1.14 update

 With VMware Fling 1.14 and the latest commits of the edk2-3588 firmware, the Orange Pi 5 Plus can now utilize some USB NICs, and make use of all USB ports within an ESXi environment.


I can hot add USB NICs as well. It seems to run into the same problems that I had on the ThinkCentre M75q Gen 2 and USB NICs, in that the vmnic needs to be assigned to the management vSwitch on boot. The requirement to comment the line out of the BIOS doesn't seem necessary, either; you can do so by entering system setup and disabling PCI-e 3.0 in the menu. My BOM now consists of:

Orange Pi 5 Plus
3D printed case
Noctua NF-A4x20 PWM
USB fan adapter (USB 2.0 port)
UGREEN USB hub + network adapter Model 60544 (Managment network + additional USB ports) 
Cable Matters USB NIC Model 202013 (dedicated VM traffic)
Sabrent USB to SATA adapter Model EC-SSHD
Crucial MX500 1TB SATA SSD

This leaves the option of adding additional USB 3.0 devices if needed, thanks to the UGREEN hub. The onboard Realtek 8125's are not of much use as there is no driver available, but getting dual gigabit NICs makes this much more useful to run some basic web servers. 


I was able to port my Jira instance off of my Raspberry Pi 4 onto a Ubuntu 22.04 VM successfully, which opens the door to back up not only at the application level, but full VM backup as well. The only remaining caveat is that the cores run at their minimum speed (800 Mhz), but that bodes well for me given that I want to keep power consumption as low as possible. It'll be worthwhile to have a virtual platform where the power sipping Orange Pi 5 Plus can remain on, without having to power on a rack to deliver some basic web applications. Other ideas would be to install Tautulli for my Plex server, or Wiki.js for lab documentation. 

Thursday, July 20, 2023

Booting the Orange Pi 5 Plus into ESXi on ARM

Disclaimer: Orange Pi products are not officially supported for ESXi on ARM. Even if you do get it to work, functionality will be limited at the time of this writing. I would not recommend purchasing an Orange Pi for the expressed purpose of ESXi on ARM. The folks working on the edk2-3588 UEFI project are doing amazing work, and I can't wait to see what comes next.

With that out of the way...


Booting and installing the ESXi on ARM Fling is possible on the Orange Pi 5 Plus. There are some pretty sizable caveats in doing so:

  • On-board NICs are Realtek 8125, which do not have a compatible driver
  • The only usable network adapter is the Realtek 8153 USB, which is capped at 100Mbps
  • M.2 NVMe slot is not supported - having a device in the M.2 slot will cause drivers to hang when trying to boot
  • Modification and creation of the edk2-rk3588 UEFI firmware project is necessary
  • Hardware BOM needs to be used in specific ports in order to work
  • Once installed, ESXi only recognizes the lone USB-C port, a hub is necessary
  • As of this writing, the USB NIC Fling driver does not work with the ESXi on ARM Fling (no Fling-ception allowed)
This blog post will serve as a guide to get this installed, the bulk of which is modifying the firmware to work properly. My BOM is as follows:

  • Orange Pi 5 Plus with 3D printed case and 40x40mm fan
  • 16GB USB 3.0 thumb drive for ESXi installer (connected to the top USB 3.0 port)
  • USB-C to USB A adapter
  • Cable Matters 4 port USB hub, connected to the USB-C to USB A adapter 
  • Cable Matters USB Network Adapter model 202013 (connected to hub)
  • USB keyboard (connected to hub)
  • USB 3.0 to SATA adapter with 1TB SSD as an install target/ESXi boot (connected to hub)
  • 8GB Micro SD Card for edk2-3588 UEFI firmware (can use eMMC if your model comes with it, this guide will cover SD card)
The first step is to build out the UEFI firmware. The folks working on this project have been hard at work, and have successfully built firmware that allows things like the WoR Project (Windows on ARM) to gain some functionality. The base release works pretty well for Windows, but for ESXi, we'll have to build a custom version of it.

To do so, we'll need to use a Linux environment. I chose Ubuntu 23.04. The install instructions on the github page linked above include almost all of the packages needed. For my version of Ubuntu, I installed the following:

sudo apt install git gcc g++ build-essential gcc-aarch64-linux-gnu iasl python3-pyelftools uuid-dev device-tree-compiler

Then, clone the repository and change directory:

git clone https://github.com/edk2-porting/edk2-rk35xx.git --recursive
cd /edk2-rk35xx

Prior to building the firmware, we need to modify one of the files to disable PCI-e 3.0. If this step is not followed, the installation media will purple screen during boot. Use vim to modify this file:

sudo vi /edk2-rockchip/Platform/OrangePi/OrangePi5Plus/AcpiTables/AcpiTables.inf

Once you're in the file, comment the following line:

$(RK_COMMON_ACPI_DIR)/Pcie2x1l0.asl
Confirm that the line looks like this, then write changes:

# $(RK_COMMON_ACPI_DIR)/Pcie2x1l0.asl
Now we can build it (change release number to match the latest release found on the github page. As of this writing, 0.7.1 is the latest:

sudo ./build.sh --device orangepi-5plus --release 0.7.1
After a few minutes, the script should finish, and create a file named "RK3588_NOR_FLASH.img" in the edk2-rk35xx directory. You can then either use dd to copy the .img file onto an SD card, or SCP the file to a Windows machine and use the Raspberry Pi imager tool to write the file instead.

With the freshly imaged SD card inserted into the Orange Pi, we can now plug everything else into the machine. Remember, the device order is as follows:

  • USB drive containing ESXi installer in the top USB 3.0 port
  • USB hub plugged into the USB-C port
  • Keyboard, SSD and Realtek 8153 adapter plugged into the hub
If all goes well, ESXi should boot without issue, and will see the network adapter and SSD. Install ESXi as you normally would. I made the mistake of thinking that I could put the USB SSD on the 3.0 ports after installing - this will work, meaning ESXi will still boot, but any additional capacity used for the datastore will be inaccessible, and ESXi will be read only. You must keep the SSD and network adapter on the hub. 

The promise of an 8 core, 16GB RAM, ARM based ESXi machine looks great. I'm hoping that in the not too distant future, we can see more improvements, such as additional USB port and NVMe disk utilization. A workaround for the lack of networking would be to pass another USB network adapter to a VM, which could act as a DHCP server and present gigabit connectivity for other guests, but this would only work if the other USB ports were recognized. 

Time will tell what the future holds for the Orange Pi 5 Plus, but to have UEFI functioning at this level is fantastic, and I can't say enough good things about the people working on this project. Also, a special thanks to the ESXi on Arm team, who have made this endeavor possible.

Thursday, May 11, 2023

HCIBench analysis part 2: vSAN OSA vs. vSAN ESA with all Optane drives

 In my previous post, I compared what a huge difference having proper caching drives can make with vSAN OSA, replacing my read intensive disks with Intel Optane. One question remains, however: since Optane are high performance, mixed use drives, how would they get along with a vSAN ESA deployment? To find out, I reconfigured my vSAN cluster by deleting the witness VM, deploying a vSAN ESA witness, and loaded each server with 5 Intel Optane disks each. Let's see how it got along.

Caveats: 

  • ESA has compression only mode on automatically, and cannot be disabled (OSA was tested without dedupe or compression enabled)
  • ESA best practices call for a minimum of three nodes. It can absolutely work with two nodes but would see true performance benefits in a right sized cluster


100% read, 4K random


Interesting result, as the vSAN OSA with 2x Optane for caching and 2 read intensive capacity disks actually managed 24K higher IOPS on this test. There are a few likely reasons that I think this would happen:

  1. The benchmark likely kept everything in the hot tier throughout the benchmark
  2. As mentioned previously, ESA is running compression while OSA is not. I plan on re-running this benchmark specifically with compression only enabled on the OSA configuration.
  3. ESA works best at the recommended configuration (3+ nodes).

70% read, 4K random


Where Optane improved write performance in the OSA model, ESA with 5 Optane disks per node improved further. We see an improvement of 53K IOPS, as well as higher throughput, and generally better latency across the board.


50% read/write, 8K random


We get a decent bump in performance in comparison to the OSA build. Read latency remains low, write latency remains about the same.


100% write, 256KB sequential


This is perhaps the biggest difference between all the tests, and highlights the key advantage of vSAN ESA especially for a 2 node cluster. Where some of the other tests showed percentage bumps in performance, ESA with write intensive disks managed to get over twice the throughput of vSAN OSA. 5.69GB/s represents 45.52 Gb/s over the network cards. Latency also improved dramatically.

Overall, the 2 node vSAN ESA with 5 Intel Optane disk per server configuration performs generally as expected, comparatively outperforming the OSA with capacity disks. While OSA went blow for blow with ESA, it should be reiterated that deduplication and compression were disabled; IOPS performance tends to be lower in favor of capacity. One thing that I've omitted from these is the usable capacity, of which I would defer to the vSAN calculators to get final numbers, but keep in mind: vSAN OSA accomplished it's numbers with a datastore size of ~13TB, whereas the 280GB Intel Optane disks granted a capacity just north of 2TB.

So what can we take away from this? Is OSA dead? Not by a long shot. In a real world, 2-node ROBO scenario, several questions should be asked:

  • What is the workload?
  • How much performance do you need?
  • Are mixed use drives going to be able to meet capacity demands?
  • What's the best bang for the buck hardware to meet workload requirements?
In a workload that favors capacity and read intensive workloads, I would favor vSAN OSA. For performance, ESA should absolutely be a consideration. And if you have the chance to get more nodes, the capacity and performance improvements tend to favor ESA.


Monday, May 8, 2023

HCIBench analysis part 1: OSA vs. OSA with Intel Optane

In my previous post, I shared my current vSAN setup details. In this post, we'll take a look at the performance of the original vSAN deployment, and see how much of a performance difference Optane can make when we replace sub-optimal cache disks with Optane for OSA, followed by a full Optane and ESA redeployment.

As previously stated, the cache disks that I have in my current vSAN OSA 2 node cluster are not optimized for caching as they are read intensive disks, and they are mismatched capacity. When running vSAN in a production environment, it is best to adhere to the vSAN HCL as well as the appropriate disks for cache and capacity. While my 3.84TB read intensive drives will be great for capacity, I should be using a write intensive cache disk. Fortunately, the Intel Optane 905's that were sent to me through the vExpert program and Intel should do the trick.

For benchmarking comparisons, I'm using HCIBench 2.8.1. This free utility is provided by VMware as a "Fling". It is an OVA template that, once deployed, allows us to automatically create Linux based VMs that run preconfigured Flexible I/O (FIO) benchmarks. Throughout the benchmarking process, I have selected "Easy Run", which will automatically deploy the number of VMs it feels is correct based on my hardware configuration.

The first thing I did was select the default benchmarks and deploy each on the original vSAN OSA configuration. The "Easy Run" mode determined it would be best to deploy 4 VMs, as I suspect the cache wasn't up to par. 

Of note, all OSA benchmarks were run with deduplication and compression disabled.  


Here's how it went:

100% read, 4KB random


This is decent, but expected considering all of the disks are read intensive. 


70% read, 4KB random


This is more of a realistic bench, with some write performance metrics. Read latency is pretty high.


50% read/write, 8KB random


This simulates database workloads with an equal mix of reads and writes. With the larger block size, performance improves a bit, but latency remains a concern.


100% write, 256KB sequential


The throughput bench, best for video and media. We come close to saturating the 10Gbe link between the two servers on this one. 


For the next tests, I'll remove the 1.2TB and 1.92TB cache disks and replace them with two of the Intel Optane 905's. These are 280GB each, and have drastically better read and write performance capabilities. I could, in theory, use four cache disks, but vSAN prefers a 1:1 cache to capacity disk ratio. This was also the point where I swapped out the 10Gbe 82599 network card and replaced it with a ConnectX-4 CX455 100Gbe card to ensure we don't run into a bandwidth bottleneck (although I doubt I'll be able to saturate 100Gb). We should see a measurable difference across the board in terms of vSAN OSA performance. 

Of note, when selecting "Easy Run" on the following tests, HCIBench deployed 8 benchmark VMs.

100% read, 4KB random


Here we can see an increase of 200K IOPS. Despite the read intensive nature of the original disks, the Optane disks are rated higher for reads and substantially higher for writes. I'm not sure why the results failed to capture the 95th percentile read latency, but I would expect it to be similar to the original OSA result


70% read, 4KB random


Unsurprisingly, the write performance improved dramatically, as well as read latency. 188K IOPS at 70/30 for a 2 node cluster is impressive.


50% read/write, 8KB random


Once again, we see the difference in performance thanks to the Optane drives. 172K IOPS and much lower latency.


100% write, 256KB sequential


This was surprising for me. Just by replacing the cache disks, we can see a near 3.5x bandwidth increase. We see that it would've more than saturated the 10Gbe link, so switching to the 100Gbe card gave us a better idea of what to expect. Average write latency also improved considerably!

Overall, we can see a clear advantage in using the Intel Optane disks. It is critical to choose a cache disk that excels in write intensive workloads, as "hot tier" data gets pushed to capacity over time. By contrast, ESA excels with uniform, mixed use disks. We've seen that Optane has impressive write capabilities, but it also has great read performance. Optane can do it all, but what will the HCIBench numbers reflect? Stay tuned for my next blog post, where we'll compare vSAN OSA with 4 Optane cache/4 capacity disks to the ESA with 10 Optane disks test. 

Tuesday, May 2, 2023

My current setup: vSAN OSA 2 node cluster

I'm excited to announce that I was selected for the vExpert Intel Optane giveaway. To prepare for the incoming drives, I've started a series of blog posts focusing on benchmarking my two-node vSAN cluster. This will serve as a baseline of what to expect in terms of differences between using best practices for OSA as well as the fundamental performance differences of ESA.

My BOM consists of:

Supermicro BigTwin 6029BT-DNC0R
2x X11DPT-B compute servers (OEM branded), each containing:
  • 2x Xeon Silver 4116
  • 768GB DDR4 (24x32GB)
  • Intel X550 RJ-45 10Gbe dual port SIOM network card
  • RSC riser to break up x16 slot into 2 x8
  • Intel 82599 SFP+ 10Gbe dual-port network card in slot 1 of the riser
  • 10Gtek PCI-e x8 to 2x U.2 NVMe drive adapter in slot 2 of the riser
  • Open PCI-e x16 low-profile slot
  • Backplane supports 2x U.2 NVMe with 4 SAS/SATA HDD/SSD per server
Each node contains a single NVMe cache disk along with two NVMe drives for capacity. The drive list is as follows:
  • Node 1: Intel DC P3500 1.2TB for cache, 2x SanDisk Skyhawk 3.84TB for capacity
  • Node 2: SanDisk Skyhawk 1.92TB for cache, 2x SanDisk Skyhawk 3.84TB for capacity
The cache disks are not recommended for two reasons: They are mismatched in size, and they are not write-intensive disks. Nevertheless, they are what I have on hand and should be enough to establish a baseline of vSAN OSA performance. 

The first port of the X550 will be used for management and VM traffic (green lines), and the second will be used for vSAN witness traffic (blue lines). I didn't have a switch capable of handling VLANs, so this will run over two "dumb" 8-port switches. The servers will be direct-connected over the 82599 network cards to pass vSAN storage traffic (red line).


Once we have benchmarked the original build, the plan is to swap the cache disks with Optane drives for OSA, then use them all for ESA. With the 10Gtek cards, each server can hold a maximum of 6 NVMe disks. vSAN OSA prefers to have a 1:1 cache-to-capacity disk ratio, so we will test with 2x Optane and 2x capacity disks, followed by 5x Optane for ESA. To make room for the second NVMe adapter, I'm going to use a ConnectX-4 100Gbe adapter in the open x16 slot for testing, while it is overkill, I don't want there to be a bottleneck (and the original build won't likely saturate the 10Gbe link currently in place). The latest HCIBench utility as of this writing is 2.8.1 and will be utilized in "easy run" mode. Stay tuned!


Monday, March 20, 2023

Adding 10Gbe networking to the Lenovo ThinkCentre M75q Gen 2

 This post has been a process, but finally, I'm happy to report that 10Gbe works on the M75q Gen 2 and also with ESXi 7.0. There were several challenges that needed to be addressed:

  • No PCI-e slot
  • No expansion chassis
  • Only 1x SATA and 1x NVMe
  • Realtek NIC onboard

The reason I wanted to use this system is because of how compute dense it is for the form factor - a <1L system that houses 8 Ryzen cores and 64GB of DDR4 would make a great power sipping small box for the homelab; adding 10Gbe networking would allow it a better storage option for VM consumption. I've addressed how to overcome the Realtek NIC in a previous blog post by utilizing the USB fling, now we'll cover what it takes to add the 10Gbe card.

Our BOM is as follows:

The case extender was designed by me, which allows a single slot PCI-e card to be installed and has a hole on the side to allow a screw driver to affix an M3 screw to secure the card, and a slot in the back to pass the USB to SATA cable through.


Once the card has been connected, ESXi can be booted and the card should be recognized:


The only real issue that I've run into so far is what cards are supported by this setup. I have an Intel X550 (Lenovo OEM) which physically fits the slot, but wasn't detected on boot. I assume this is a power delivery limitation, as I doubt the USB adapter can provide enough juice. I would like to test the quad port Intel i225 card provided by QNAP, and may do so in the future as having supported NICs would make booting this much easier.

Tuesday, February 21, 2023

VMware Cloud Professional certification - thoughts and tips to pass

 I recently passed the VCP-VMC 2023 exam, which was made possible by the free VMware course that allowed me to check the prerequisite for the certification. For those looking to take on the exam, I'll include what I can remember in terms of general concepts.

For starters, and as per usual with any VMware exam, start with the exam guide.

Like anything to do with cloud, it is network heavy. I'm not a networking engineer but have a long-since lapsed CCENT certification. This exam is going to grill you on CIDR, subnets, and network overlaps, and assumes that you have a general knowledge of the OSI model. Focus as well on the different connection and VPN types for each cloud provider. While it primarily focuses on AWS, GCP and Azure questions were in there as well, so be sure to know what each provider supports for configuration minimums and maximums regarding management networking configuration.

Speaking of minimums and maximums, you'll want to read up on cluster sizes and hardware configurations. What are the specs of an i3.metal instance vs. an i3en.metal? What kind of nodes can you get with Azure and GCP? And how many can you throw into a cluster? All of these may appear on the exam.

Managed services, such as VMware Cloud on Dell EMC and AWS Outposts should be studied as well. What physical requirements do these carry? What are their responsibilities?

HCX... woo boy. Several of these questions showed up, and did nothing but generate anxiety. Get to know HCX. Get to know the deployment models, and read up on how to troubleshoot different scenarios.

Containers, Kubernetes and Tanzu all showed up on my exam. Know what TKG does, how to deploy it, what value Kubernetes brings to containers in general, and what Tanzu services do what function.

That's all I can remember as of this moment. I'm still kind of pumped from getting through it. The only feedback that I have is that I don't know if some of my answers were right as they may have changed after the exam was written. For instance, Google has updated their networking requirements as of November 2022, so I'm not sure if I got the question wrong by answering based on current requirements, or if I should've answered based on previous specs. Perhaps a higher-level question that isn't dependent on something that can change with relative frequency would be better.

I hope you found this helpful. Feel free to comment below or ping me on Twitter if you have any questions!

Friday, February 17, 2023

vSphere 8.0 2023 homelab buyer's guide

The hardware market has started to recover, and with vSphere 8.0 introducing native support for the excellent Intel i226-V network card, some new contenders have arrived in terms of price to performance that generally should be able to run ESXi. This post will focus on several categories, including mini PCs, second hand workstations and servers, and whitebox builds that should meet the requirements of the updated HCL. Let's get started!


Mini PCs

NUC like systems are a classic piece in the homelab. Historically, the tradeoff has been limited network connectivity and/or lack of compute/memory density. Now, however, there are some exceptions to the rule. 

Topton, a 6 year old shop on AliExpress, has an AMD Ryzen 5000 series based "router" which grants 6 to 8 cores, up to 64GB of RAM, 3x M.2 NVMe slots, and four i226-V based 2.5Gbe ports. With an entry point of $346 USD at the time of this writing, along with a claimed capability to ship VAT/Tax free (not verified, YMMV), this looks like it could be the value king mini PC of 2023. Be wary of copycat shops who may offer similar specs at a higher discount; ensure that the store has been around for some time as not every seller can be trusted. Intel based systems can also be found with similar specs (minus the awesome core count, of course) for ~$200 USD for super cheap vSAN clusters. 

Sadly, mini PCs still suffer from a lack of PCI lanes, but I found a creative way around this... that's reserved for a follow up blog.


Second hand workstations

With buying cycles slowing down in an uncertain economy, second hand hardware is getting harder and harder to come by. Workstations, however, are sometimes offered up on eBay for a deep discount. Most of the hardware in these are supported by ESXi, with perhaps an exception for the onboard network card. Fortunately, to make up for this, they have several PCI-E slots, so adding a supported NIC isn't too much of a hassle.

The Dell Precision T7820 and T7920 can sometimes be found with Xeon Bronze or Silver processors in the sub $500 USD range. Recently, I saw a 2x Silver with 64GB of RAM listed for $350 USD. The HP equivalent Z6 G4 and Z8 G4 can be found for similar price points. Both of these *should* come with an Intel based on board NIC according to their drivers on their respective support pages. Be wary of barebone kits, as these systems do not have onboard graphics - a barebone system with no GPU will require a graphics card to function properly.

Looking forward to the future of Threadripper based workstations - The Dell Precision 7865 can pack up to 64 cores in a standard ATX tower form factor. Definitely not cheap, but exciting to see nonetheless!


Second hand servers

As of this writing, the same issue that is faced with workstations is impacting servers ten fold. Most hardware vendors are officially ending support for socket 2011-3 based servers, such as PowerEdge 13G, HPE Proliant G9, and Cisco UCS M4 systems. These are also falling out of support with ESXi 8.0, as they were originally introduced in 2014. The next generation of each (14G, G10, M5) are difficult to find on eBay for a decent price. I'll post an update to this in another blog post later this year, as I expect more second hand hardware will drop in price closer to the EOL of the older generations.


White box builds

Building out hardware that is intended for gaming and enthusiast builds has some caveats. Most gaming systems use a Realtek NIC for gigabit or 2.5Gbe networking onboard. These cards are not supported with ESXi as there is no compatible driver. Our options are:

  • Find a board with i226-V onboard (i225 for most gaming boards had many issues, regardless of revision)
  • Add a supported USB NIC with the Fling driver
  • Add a supported PCI-e NIC (and/or HBA if using a CPU with onboard graphics enabled)
AM4 builds that can make use of the Ryzen 7 5700G or Intel builds with onboard graphics can allow for multiple supported network cards. Enthusiast boards, such as the B550, have many of the similar options you'd expect to see on a server board regarding BIOS options. If you want to add in KVM-like capabilities, you can also invest in a Raspberry Pi based PiKVM solution that can allow for remote out of band management, but these cost quite a bit for a quality of life feature.
SuperMicro also has some relatively cost effective hardware available second hand on eBay, such as the H11SSL motherboard at $400 USD, which supports 8-32 cores (or up to 64 if it's revision 2.0), although you still need to factor in the cost of a heatsink, CPU and ECC memory.

Tuesday, January 3, 2023

Installing Ansible on CentOS for vSphere First Class Disks

I've been wanting to play with first class disks for some time now, and needed a means of doing so. While there are many ways to interact with vSphere APIs, Ansible provides a means of automation that has some key advantages (primarily in that it is free). This post will get us started on installing Ansible in a CentOS 9 environment, as well as installing the VMware Community modules and deploying a runbook that will create a first class disk.

The first thing we'll need to do is install Ansible. With CentOS 9, we'll need to add a repository in order to install it.

sudo yum install epel-release
sudo yum update
sudo yum install ansible
Once installed, we'll need to install some additional modules - python package manager (pip3), python SDK for VMware API (PyVmomi), and the VMware Ansible collection:

sudo yum install python3-pip -y
pip3 install PyVmomi
ansible-galaxy collection install vmware.vmware_rest
Once complete, we can work on updating our Ansible hosts file and write our first playbook. The hosts file for Ansible is located at /etc/ansible/hosts. Using the text editor of your choice, add the hostname or IP address of your vCenter server to the last line of the file.

To prepare the VMware environment, ensure that SSH is enabled on both the vCenter server and host(s) that you plan on running the playbook against. I took the extra step of starting an SSH session to each (root@vCenterIP and root@ESXiHostIP) to log the key thumbprint for each; while this may not be necessary, it's a force of habit for me.

Finally, it's time to write the First Class Disk playbook. The playbook will create a 1GB FCD based VMDK onto the datastore of our choosing. This will require the vCenter username and password. While I suggest using a variable file to store this information (shorthand "vars"), for the purpose of this example I will use plain text. I used the command "vi fcd.yml" and wrote the following:

- name: FCD
  hosts: localhost
  become: false
  gather_facts: false
  collections:
    - community.vmware
  tasks:
    - name: create disk
      vmware_first_class_disk:
        hostname: '(vCenter IP address or FQDN)'
        username: 'administrator@vsphere.local'
        password: '(enter password here)'
        validate_certs: no
        datastore_name: 'Datastore1'
        disk_name: '1GBDisk'
        size: '1GB'
        state: present
      delegate_to: localhost

Let's break this down a bit:
Hostname: Use the vCenter IP address or FQDN.
Username: Typically administrator@vsphere.local but can be a domain account. Note that as we are carrying out a vSphere action, we do not want to use "root" here.
Password: The password for the above username.
validate_certs: This was a work around for an error that I received when first trying to run the playbook. There may be other ways around it, but adding this line seems to do the trick.
disk_name: I'm not entirely certain this variable works, but it is called out in the Ansible example.

Once this is written, we can execute the playbook with: ansible-playbook fcd.yml
This should yield the following result:

PLAY [FCD] *********************************************************************

TASK [create disk] *************************************************************
ok: [localhost]

PLAY RECAP *********************************************************************
localhost                  : ok=1    changed=0    unreachable=0    failed=0    skipped=0    rescued=0    ignored=0
When we log into vCenter, a new folder on the target datastore should have a label of "fcd", and we can see the new VMDK:


Tuesday, June 21, 2022

Lenovo ThinkCentre M75q Gen 2 ESXi 7.0 U3 install guide

 The last year or two hasn't been kind to homelabbers' budgets. Supply chain issues have had an insurmountable impact not only on new parts and servers, but on the second hand market as businesses desperately snap up what they need. Fortunately, supply chain and global economic recovery are making both availability and pricing of some components affordable again.

In a previous blog post, I touched on the options available for servers. Mini PCs and NUC like systems offer a lot of value, especially with the Fling drivers that add Intel and Realtek USB NIC functionality. The Fling drivers allow for USB network cards to be added to systems that have limited or no supported network adapters. Such is the case with the Lenovo ThinkCentre M75q Gen 2. It only has one network card onboard, the RealTek 8111 gigabit adapter. RealTek does not make a driver for ESXi, and while drivers have existed in the past, they were vmklinux and community based, meaning they do not work in ESXi 7.0. There are also a handful of new Intel network cards that do not have a supported driver, but this is answered by a Fling driver as well. The workaround is to add gigabit and 2.5GbE USB network cards to the system, and inject the Fling driver to the ESXi image prior to install. 

Hardware wise, I have added a CableCreation USB 3.0 Gigabit LAN 2.5Gbe adapter for the storage network, as well as a TP-Link UE300 Gigabit adapter for management.


To do so, we will need to install PowerCLI. I'll include the install commands which were taken from this link:

  1. Open PowerShell as an administrator
  2. Run the following command: Install-Module VMware.PowerCLI -Scope CurrentUser
  3. Press "y" if prompted, then enter

The next steps are borrowed directly from the first objective of the VCAP exam. 
  1. Add an offline bundle to work with, in this case I'm using an offline bundle I created previously:
    • Add-EsxSoftwareDepot ESXi-7.0U3-USBNIC.zip
  2. List the profile(s) available within that offline bundle, and make note of it:
    • Get-EsxImageProfile (in this case, it listed ESXi-7.0U3-USBNIC as the profile)
  3. Add the fling driver:
    • Add-EsxSoftwareDepot ESXi703-VMKUSB-NIC-FLING-51233328-component-18902399.zip (this will change in the future, be sure the filename matches!)
  4. Clone the profile:
    • New-EsxImageProfile -CloneProfile "ESXi-7.0U3-USBNIC" -name "ESXi-7.0U3-injected" -Vendor "vshoestring"
  5. Add the Fling software package to the newly created profile:
    • Add-EsxSoftwarePackage -ImageProfile "ESXi-7.0U3-injected" -SoftwarePackage "vmkusb-nic-fling"
  6. Export to ISO:
    • Export-ESXImageProfile -ImageProfile "ESXi-7.0U3-injected" -ExportToIso -filepath ESXi-7.0U3-injected.iso

Note that if you have issues exporting to ISO, you might have to export it to an offline bundle first then repeat the process above with the new offline bundle. To export it to an offline bundle instead:

    • Export-ESXImageProfile -ImageProfile "ESXi-7.0U3-injected" -ExportToBundle -filepath ESXi-7.0U3-injected.zip
One caveat that I've run into with using a system that only utilizes RealTek USB NICs is that the install process will halt as the system does not detect supported network cards. If you reboot, it will boot to ESXi just fine but will not store the configured password - use a blank password to configure the host.
Another issue is that on reboot, vmnic configuration isn't maintained on the virtual switches. This is due to the USB driver loading out of order. The only fix I've found is to manually reconfigure the management network adapter. Once complete, remove other vmnics from the virtual switches then re-add them.

The benefits of the M75q Gen 2 is that the CPU performance is on par with some of the Intel Xeon processors that I have in my lab currently. Granted, they are 6-8 years old at this point, but at a fraction of the power consumption, it is something that I can feel comfortable keeping powered on 24/7 without much consequence. My next blog post will compare power consumption benchmarking.

Realtek network driver working with ESXi 8.0

 One of my older homelab hosts has been chugging along for a few years now. The Lenovo Thinkcentre M75q Gen 2 has served me well, and while ...